If you don’t have a website running WordPress already, now is the time to do so. This tutorial will cover the full installation process of a WordPress site. Be aware that this is for creating your own, self-hosted WordPress site using the downloadable software from wordpress.org, not the hosted service from wordpress.com.
(If you already have a WordPress website up and running, you can skip to Installing Your WordPress Theme.)
Acquire A Web Hosting Space
To host a WordPress site you will need to look for a web hosting provider. There are many inexpensive hosting companies that can offer you a shared hosting account. As a starting point, shared hosting should suit your needs fairly well, and you can move to a more powerful hosting type later on.
Inside your web hosting panel, you will need to create a new database, as well as a database user with a username and password. Note down these three pieces of data, as we’ll use them later on:
- Database Name
- Username
- Password
Download WordPress
Go to the WordPress homepage and download the latest version of WordPress. Once the download has finished, unzip the downloaded file and proceed to upload the contents of the WordPress package to your web hosting. To do that, you can use an FTP client such as FileZilla. Once all the files have been uploaded, you will see the following screen if you access your website.

Create a Config File
Now you need to open the WordPress package you downloaded, and create a copy of the wp-config-sample.php file, located on the root folder. Rename it wp-config.php and open it.
Inside this file, you will need to add the database details you noted down before, so the data from your WordPress site can be saved to a persistent place. Now proceed to upload the modified config file to the WordPress install, and refresh the page on your browser.
Configure Your WordPress Install
In this page, you need to indicate the title of your website (it can be changed later on), as well as the credentials for your administrator account. We highly recommend avoiding naming your user ‘admin’, and choosing a custom username instead for security purposes. It’s also recommended to go for a strong password. Letting search engines index the site is also highly recommended.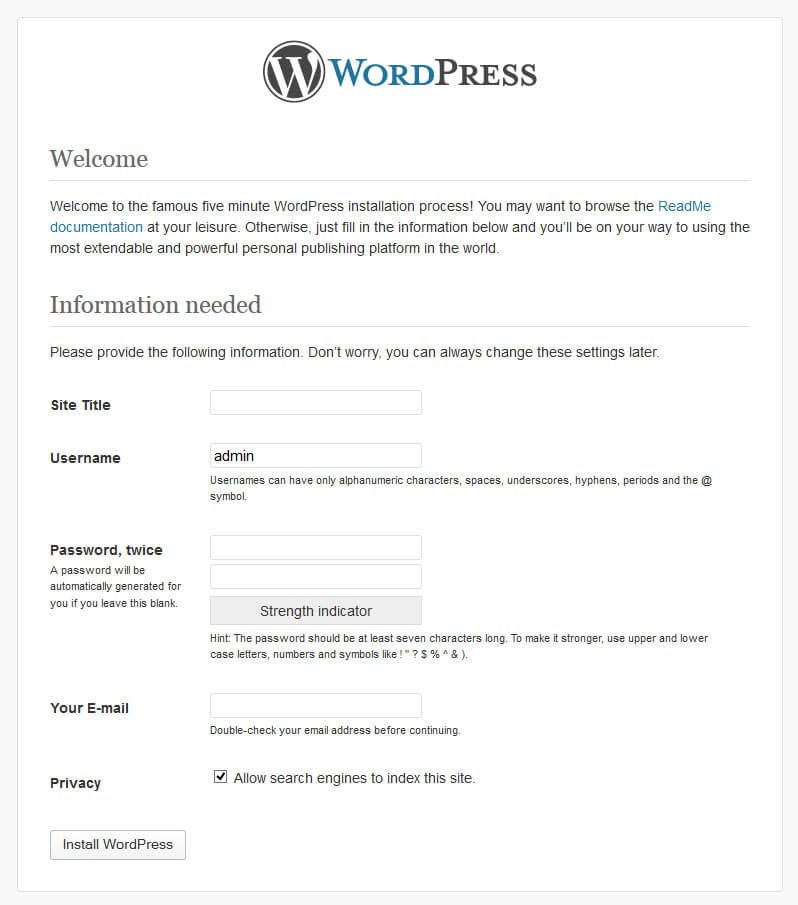
Once all the data has been input, simply click on Install WordPress and you’re ready to start publishing!
Installing Your WordPress Theme
Once you have a WordPress installation set up and running, all you have to do to give your site a new look is to install your new theme! There are various ways to do that:
- Use the WordPress theme installer to upload your theme
- Use a FTP account to manually copy your theme files into your WordPress installation
For many, the former method is easier and less painful, but depending on your server’s configuration it could be unavailable. In this page, both will be covered.
Using the theme installer
The theme installer is located in the admin menu, in Appearance > Themes. There you will find the Install Themes tab at the very top.
To install a theme from CPOThemes, you must select the Upload option, which will allow you to select a file for uploading onto your WordPress installation. Select the ZIP file you’ve downloaded, and then hit Install Now.
The theme files must be located directly inside the ZIP file or inside a single folder, without any additional folder levels. This applies to our premium themes, which come with some additional resources such as demo files and graphics. In such case, WordPress won’t be able to properly locate the theme files and the installation will fail.
If everything went okay, you should get a confirmation message indicating that the theme was successfully installed.
Manually uploading your theme files
Should the WordPress theme installer not work, there’s always the possibility of using an FTP account to manually upload the theme files. The end result is the same, as installing the theme only means the files have been copied to the right folder in your WordPress installation.
For the uninitiated, FTP is a system that lets you connect to a server and view its files through the use of an account. It also lets you upload or download files in a more reliable manner than, say, through a browser. A popular FTP client program is FileZilla.
First, connect to your server using an FTP account. Then, navigate to your WordPress installation (normally installed in the top folder, or ‘root’ folder), and locate the wp-content/themes/ folder. Then upload all the theme files inside a single folder, with any name you want it to have. The resulting file structure should be as follows:
Your WordPress install > wp-content > themes > yourtheme > style.css and other files
Just like when using the theme installer, the theme files must be located in a single folder in the themes folder, with no additional sub-folders. Not doing this will likely break the theme.
Activate your theme
Once your theme has been uploaded, all that’s left to do is activate the theme. Head over to Appearance > Themes, and then look for the theme you just installed. Hit Activate, and you’re done!